Nested Virtualization with Slicer
Nested virtualization refers to running a virtual machine within another.
Generally, you should always aim to run microVMs directly on bare-metal for the best performance and lowest overheads. There are a few use-cases where that is not possible, so nested virtualization provides an alternative at the trade-off of some additional latency.
There are three main use-cases for nested virtualization with Slicer.
- Your primary OS is MacOS or Windows, which means you have to run Slicer within a Linux VM.
- You only have access to cloud VMs from DigitalOcean, Azure, or Google Cloud Platform (GCP) rather than bare-metal servers.
- You want to run Slicer within Slicer for testing and experimentation.
For the first two use-cases, there's nothing extra for you to do. You're simply running all the Slicer commands within an existing VM.
For the third use-case, to run Slicer within Slicer, you just need to pay careful attention to the IP addresses and routing configurations if you want the host to be accessible on the outer network.
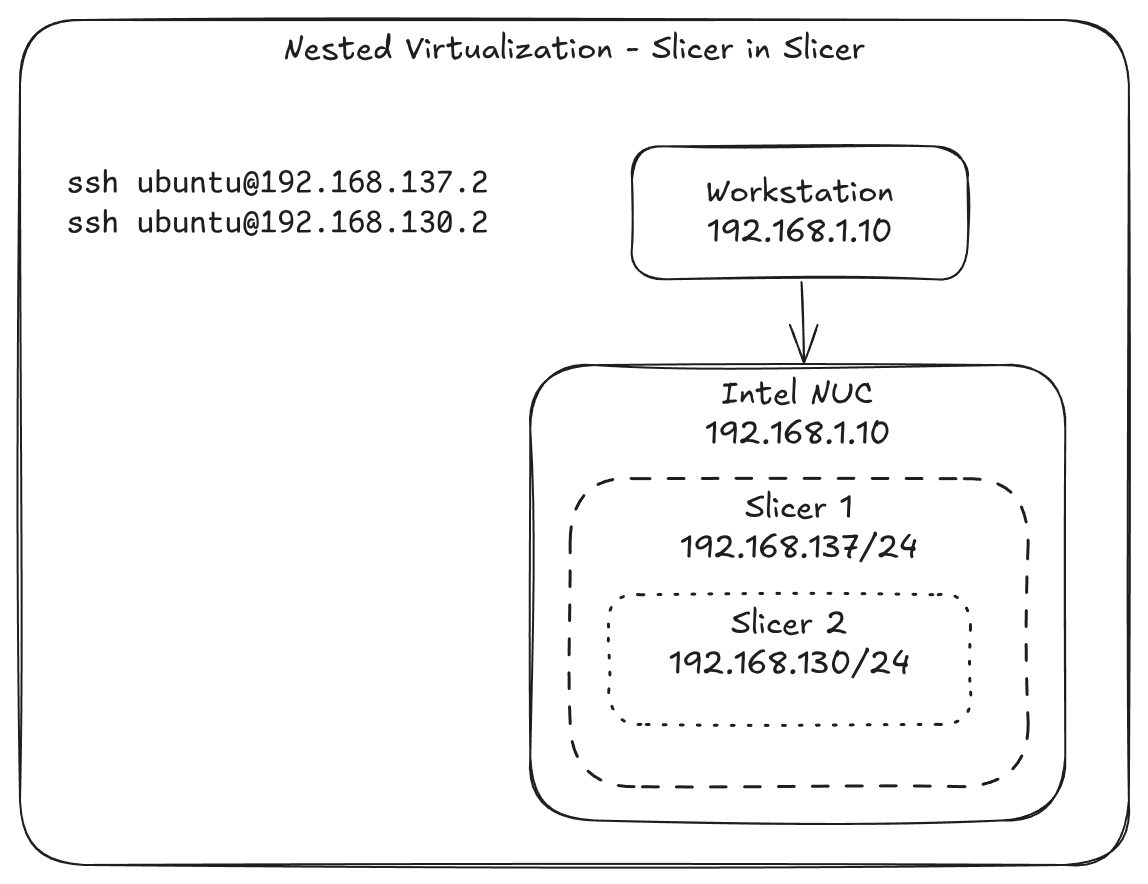
This image shows an example of nested virtualization setup running on my Intel N100.
Prerequisites
- The IP range of the outer Slicer host must differ from the IP range of the nested Slicer. This example uses
192.168.130.0/24for the outer host and192.168.137.0/24for the nested host. - The Slicer host and Slicer guest should use different host group names. This is due to the way the MAC address is generated through a hash.
Slicer within Slicer

Pictured: Connecting to a VM within a nested Slicer instance from an outer host on the same physical network as the virtualization host.
We are assuming you want to access VMs from your workstation IP 192.168.1.10, and that the virtualization host running Slicer is on 192.168.1.11 (it may be an Intel N100, or an old Intel NUC for instance).
On the virtualization host (192.168.1.11), there will be two slicer instances running, one within the other.
The outer slicer's IP range will be 192.168.130.0/24.
The nested or inner slicer's IP range will be 192.168.137.0/24.
On the virtualization host, install Slicer, then copy and paste the example from the walkthrough and save it as nested.yaml.
Change hostgroup's name field to nested, and take a note of the IP range i.e. 192.168.130.0/24.
If the IP range is not already set to 192.168.130.0/24, update it.
Start up slicer with the config file:
sudo -E slicer up ./nested.yaml
Once the VM is started-up, add a route on your workstation (192.168.1.10) using the output printed during VM launch.
That will be something like:
sudo ip route add 192.168.130.0/24 via 192.168.1.11
Next, connect into the first VM launced by Slicer using SSH:
ssh ubuntu@192.168.130.2
Enable KVM by loading the kernel modules:
# For AMD CPUs
sudo modprobe kvm && sudo modprobe kvm_amd

# For Intel CPUs
sudo modprobe kvm && sudo modprobe kvm_intel
Now perform an installation of Slicer within the VM.
Copy the walkthrough example YAML from the walkthrough and save it as nested.yaml.
Edit the IP address of the nested VM to 192.168.137.2.
Start Slicer within the VM:
sudo -E slicer up ./nested.yaml
Now add a route to the nested VM's IP range on your workstation (192.168.1.10):
sudo ip route add 192.168.137.0/24 via 192.168.1.11
Note how the gateway given is the IP of the virtualization host, and not the IP of the nested VM.
Now connect to either of the two VMs using SSH:
# Connect to the first VM
ssh ubuntu@192.168.130.2

# Connect to the second VM
ssh ubuntu@192.168.137.2
