Autoscaling Kubernetes (k3s) with Cluster Autoscaler
The Cluster Autoscaler is a controller offered by the Kubernetes community to add and remove nodes to a Kubernetes cluster based upon demand.
When run in the cloud such as AWS, Azure, GCP, etc, the autoscaler provisions nodes using the cloud provider's VM primitive, so EC2 for AWS, Google Compute Engine for GCP, etc.
With Slicer it launches Firecracker microVMs on one or more Slicer hosts. So you can build massive clusters at home or in your own datacentre.
- Adds new Kubernetes nodes via Slicer's REST API
- Removes nodes when they are no longer needed
- Acts in a similar way to spot instances (ephemeral nodes)
Conceptual Overview

Slicer Autoscaler Conceptual Overview running across two separate machines.
Control Plane
The Control Plane nodes will be setup statically via YAML configuration on one Slicer host. The default is 3, but you could increase that if you wished.
The Cluster Autoscaler will be deployed in-cluster using Helm, with a TOML file that defines the node groups and their scaling parameters, and which Slicer API and Token URL to use.
Workers / Agents
The workers or agents will be provisioned as required by the Cluster Autoscaler, pointing at one or most hosts running Slicer's REST API.
Demo: Watch a video walkthrough
If you'd like to see how it works, you can watch a walkthrough video on YouTube.
Step 1: Setup the Control Plane nodes
On the first Slicer host, the one that will run the control plane run the following steps.
Create and deploy a 3-node K3s control plane. This will serve as the foundation for your autoscaling cluster. For detailed instructions on Highly Available K3s setup with Slicer, see the HA K3s example.
Use slicer new to generate a configuration file for the control plane nodes.
# Create control plane configuration
slicer new k3s-cp \
  --cpu 2 \
  --ram 4 \
  --count=3 \
  --cidr 192.168.137.0/24 \
  > k3s-cp.yaml
The values above are suggestions that we've tested, but you can customise the specifications to your own needs.
--cpu- the number of virtual CPUs to allocate to each control plane VM--ram- the amount of RAM in GB to allocate to each control plane VM--count- the number of control plane VMs to create--cidr- the CIDR block to use for the control plane network (best not to change this until you've run the whole tutorial successfully)
Then start up the control plane nodes:
# Deploy control plane
sudo slicer up ./k3s-cp.yaml
sudo slicer vm list --json > devices.json
Step 1.1: Install K3s on the control plane nodes
Move over to your workstation.
Copy the devices.json file to your workstation.
Add the route that you were given when starting up Slicer to your machine.
Install K3s across all control plane nodes using K3sup Pro. K3sup Pro automates the installation process, setting up the first server and then joining the remaining servers in parallel:
# Download K3sup Pro (included with Slicer)
curl -sSL https://get.k3sup.dev | PRO=true sudo -E sh
k3sup-pro activate

# Create K3s cluster
k3sup-pro plan --user ubuntu ./devices.json
k3sup-pro apply

# Get kubeconfig and join token
k3sup-pro get-config --local-path ~/k3s-cp-kubeconfig
k3sup-pro node-token --user ubuntu --host 192.168.137.2 > ~/k3s-join-token.txt
The kubeconfig is required so that you can use kubectl to manage the cluster. There are additional flags if you want to merge this into your existing kubeconfig file under a new context name such as:
k3sup-pro get-config \
  --local-path ~/.kube/config \
  --merge \
  --context slicer-k3s-cp
The k3sup-pro node-token command fetches the token that K3s will use to add new agents/workers into the cluster, and will be consumed by the Cluster Autoscaler when it is deployed.
Step 2: Setup Worker Node Host Group
Create a separate Slicer instance for autoscaled worker nodes. This could be done on the same machine as the control plane, or a different one.
Note that the CIDR block must be different for each Slicer instance.
# Create worker node host group (starting with 0 nodes)
slicer new k3s-agents-1 \
  --cpu 2 \
  --ram 4 \
  --cidr 192.168.138.0/24 \
  --count=0 \
  --tap-prefix="k3sa1" \
  --api-bind="0.0.0.0" \
  --api-port=8081 \
  --find-ssh-keys=false \
  --ssh-port=0 \
  > k3s-agents-1.yaml

# Deploy worker host group
sudo slicer up ./k3s-agents-1.yaml
This host group starts with zero nodes (count=0). The Cluster Autoscaler will call the Slicer API to dynamically add nodes to this group based on scheduling demands.
Retrieve the API token from this Slicer instance. This token will be used by the Cluster Autoscaler to authenticate with the Slicer API when provisioning new worker nodes:
# On the worker node host
sudo cat /var/lib/slicer/auth/token
Save the value on your workstation as ~/slicer-token-1.txt.
You can repeat this process on multiple hosts to create additional worker node groups if needed.
Step 2.1: Enroll other machines
If you have additional machines that could run Slicer and provide Kubernetes nodes, you can add them by following the instructions above.
This could be an Arm64 machine (Ampere, Raspberry Pi, etc) or an x86_64 (Intel, AMD, etc) machine.
For each, make sure you change:
- the CIDR block
- the tap-prefix
- the API port
- the name of the host group
The API port doesn't strictly need to be changed if you run every Slicer instance on a different physical machine, however we've changed it since you may wish to try this out all on one computer.
I.e. to add k3s-agents-2:
slicer new k3s-agents-2 \
  --cpu 2 \
  --ram 4 \
  --cidr 192.168.139.0/24 \
  --count=0 \
  --tap-prefix="k3sa2" \
  --api-bind="0.0.0.0" \
  --api-port=8082 \
  --find-ssh-keys=false \
  --ssh-port=0 \
  > k3s-agents-2.yaml
Remember to save each Slicer API token to your workstation as ~/slicer-token-2.txt, ~/slicer-token-3.txt, etc.
Step 3: Configure Networking
In a Kubernetes cluster, every Node and Pod must be able to communicate with every other Node and Pod.
That means you must configure a number of routes.
Your workstation
On your workstation, you can get away with only adding a route to the Control Plane Slicer instance.
On each worker host
Each worker host must have a route to:
- The Control Plane Slicer instance
- Every other worker node Slicer instance (other than its own)
Making it permanent
Routes added with ip route are not permanent, so if your network link goes down, you may have to run them again. If you reboot the machine, you'll need to run them again.
When we run long-term K3s clusters with Slicer this way, we'll create a one-shot systemd unit that adds the correct routes on every boot.
Alternatively, if running at home, you could add these routes via your ISP's router.
For instance, this may be what runs on the control-plane for two separate worker nodes.
Create a file called slicer-routes.service:
[Unit]
Description=Add slicer routes
After=network-online.target
Wants=network-online.target

[Service]
Type=oneshot
ExecStart=/root/add-routes.sh
RemainAfterExit=true
User=root

[Install]
WantedBy=multi-user.target
Then enable the service to run on every boot:
sudo cp ./slicer-routes.service /etc/systemd/system/
sudo systemctl enable slicer-routes.service
Then create the add-routes.sh script at /root/add-routes.sh.
Copy and paste in the ip route commands that you were given when starting up all your worker nodeSlicer instances.
Step 4: Configure Cluster Autoscaler
Create the cloud configuration file that tells the Cluster Autoscaler how to connect to your K3s cluster and Slicer APIs.
This INI file defines the node groups and their scaling parameters:
cat > ./cloud-config.ini <<EOF
[global]
k3s-url=https://192.168.137.2:6443
k3s-token=$(cat ~/k3s-join-token.txt)
default-min-size=0
default-max-size=10

[nodegroup "k3s-agents-1"]
slicer-url=http://192.168.138.1:8081
slicer-token=$(cat ~/slicer-token-1.txt)
EOF
Note that the setting of default-max-size will affect how many nodes can be added to a node group.
If you were to have had two Slicer instances running worker nodes, the config would look like this:
cat > cloud-config.ini <<EOF
[global]
k3s-url=https://192.168.137.2:6443
k3s-token=$(cat ~/k3s-join-token.txt)
default-min-size=0
default-max-size=10

[nodegroup "k3s-agents-1"]
slicer-url=http://192.168.138.1:8081
slicer-token=$(cat ~/slicer-token-1.txt)

[nodegroup "k3s-agents-2"]
slicer-url=http://192.168.139.1:8082
slicer-token=$(cat ~/slicer-token-2.txt)
EOF
In the above example, the Slicer host may be a Raspberry Pi 5, and you should limit how many nodes can run there with an extra setting under the [nodegroup] section:
I set this to 4 (4x4=16) since the Raspberry Pi 5 has 4 physical cores and 16GB of RAM.
max-size=4
- The
nodegroupname comes from the the hostgroup name of the Slicer instance - The
slicer-urlis the API URL of the Slicer instance - The
slicer-tokenis the API token of the Slicer instance - The
k3s-urlis the API URL of the K3s control plane - The
k3s-tokenis the join token for the K3s control plane - The
default-min-sizeis the default minimum number of nodes to scale to - The
default-max-sizeis the default maximum number of nodes to scale to
Overview of all available configuration options:
| Key | Description | Required | Default |
|---|---|---|---|
global |
Global configuration options | No | - |
global/k3s-url |
K3s control plane API server URL | Yes | - |
global/k3s-token |
K3s join token for new nodes | Yes | - |
global/ca-bundle |
Path to custom CA bundle file for Slicer API calls | No | - |
global/default-min-size |
Default minimum nodes per group | No | 1 |
global/default-max-size |
Default maximum nodes per group | No | 8 |
nodegroup/slicer-url |
Slicer API server URL | Yes | - |
nodegroup/slicer-token |
Slicer API authentication token | Yes | - |
nodegroup/min-size |
Group-specific minimum size | No | global default |
nodegroup/max-size |
Group-specific maximum size | No | global default |
Step 5: Deploy Cluster Autoscaler
Deploy the Cluster Autoscaler using Helm.
If you don't have Helm, you can install it via arkade with: arkade get helm.
First, create a Kubernetes secret containing the cloud configuration file:
kubectl create secret generic \
  -n kube-system \
  cluster-autoscaler-cloud-config \
  --from-file=cloud-config=./cloud-config.ini
Create a values-slicer.yaml file to configure the Cluster Autoscaler Helm chart. This configuration specifies the Slicer-compatible autoscaler image, mounts the cloud config secret, and sets appropriate scaling parameters:
fullnameOverride: slicer-cluster-autoscaler

image:
  repository: ghcr.io/openfaasltd/cluster-autoscaler-slicer
  tag: latest

cloudProvider: slicer

autoDiscovery:
  clusterName: k3s-slicer

extraVolumeSecrets:
  cluster-autoscaler-cloud-config:
    name: cluster-autoscaler-cloud-config
    mountPath: /etc/slicer/
    items:
      - key: cloud-config
        path: cloud-config

extraArgs:
  cloud-config: /etc/slicer/cloud-config
  logtostderr: true
  stderrthreshold: info
  v: 4
  scale-down-enabled: true
  scale-down-delay-after-add: "30s"
  scale-down-unneeded-time: "30s"
  expendable-pods-priority-cutoff: -10
  expander: random
You can find other settings for the Cluster Autoscaler in the official Kubernetes autoscaler Helm chart.
Deploy the autoscaler using the official Kubernetes autoscaler Helm chart:
helm repo add autoscaler https://kubernetes.github.io/autoscaler
helm upgrade \
  --install \
  slicer-cluster-autoscaler autoscaler/cluster-autoscaler \
  --namespace=kube-system \
  --values=./values-slicer.yaml
Next, a minor patch is required to the ClusterRole so that it can remove nodes from the cluster.
kubectl patch clusterrole/slicer-cluster-autoscaler \
  --type='json' \
  -p='[{"op": "add", "path": "/rules/4/verbs/-", "value": "delete"}]'
You could also edit this manually via kubectl edit clusterrole/slicer-cluster-autoscaler, then add delete to the array of verbs under resources and nodes.
If our fork gets merged into upstream, then this patch will no longer be needed.
How to update the configuration
If you got something wrong like a token, URL, or Slicer host group name, or perhaps want to add a new Slicer instance, you'll need to update the INI file.
If you need to update the configuration, then do the following:
- Update your local INI file
- Delete the secret for the Cluster Autoscaler
- Re-create the secret
- Restart the Cluster Autoscaler
kubectl delete secret \
  -n kube-system \
  cluster-autoscaler-cloud-config

kubectl create secret generic \
  -n kube-system \
  cluster-autoscaler-cloud-config \
  --from-file=cloud-config=./cloud-config.ini

kubectl rollout restart deployment \
  -n kube-system \
  slicer-cluster-autoscaler
Setting the Expander mode
Check what expander you’re using in the Cluster Autoscaler deployment:
-
--expander=priceor--expander=least-waste- will strongly bias towards any group with less RAM/CPU per node -
--expander=random- will randomly pick between suitable groups -
--expander=most-pods- picks the group that fits the most pending pods
If you just want both groups to see some traffic, switching to random or most-pods is usually the simplest.
The expander flag can be set in values.yaml:
extraArgs:
  expander: random
Custom CA Bundle for Slicer API
If your Slicer API endpoints use self-signed certificates or certificates signed by a custom Certificate Authority, you can specify a custom CA bundle.
The path the the CA bandle can be configured in the [global] section in the cloud-config.ini:
[global]
ca-bundle = /etc/ssl/certs/slicer-ca-bundle.pem
The CA bundle file should contain one or more PEM-encoded certificates. This configuration applies globally to all Slicer API calls across all node groups.
When deploying with Helm, you can mount your CA bundle using extraVolumeSecrets.
Create a secret for the CA bundle:
kubectl create secret generic \
  -n kube-system \
  slicer-ca-bundle \
  --from-file=ca-bundle=./ca-bundle.pem
Update your values.yaml file:
extraVolumeSecrets:
  slicer-ca-bundle:
    name: slicer-ca-bundle
    mountPath: /etc/ssl/certs/slicer-ca-bundle.pem
    items:
      - key: ca-bundle
        path: ca-bundle
Test the Cluster Autoscaler
The autoscaler works by detecting unschedulable Pods and automatically provisioning new Worker Nodes through Slicer's REST API. Once workloads are removed or reduced, it will scale down unneeded nodes after the configured cooldown period.
The capacity of the Control Plane will mean that you can already launch a large number of Pods without needing any scaling.
Here's how you can force the Cluster Autoscaler to scale:
- Fill up the Control Plane nodes with Pods
- Use taints, tolerations, nodeselector labels, or other affinity rules to prevent Pods from running on the Control Plane nodes
You can watch the logs of the autoscaler to understand what it's doing:
# Watch autoscaler logs
kubectl logs -n kube-system \
  deployment/slicer-cluster-autoscaler \
  -f
In another terminal, ideally a split tmux pane set up the below:
# Pane 1 - watch nodes being added
kubectl get nodes --watch --output wide

# Pane 2 - watch which Pods are unschedulable/Not Ready - that means they're waiting for a node to be available
kubectl get pods --watch --output wide --all-namespaces
Keep another eye out on Slicer's output on the worker node host. You should see VMs being booted up and / or shutting down.
Simplest option: scale to hundreds of Pods
Create a deployment for busybox's sleep image, and give it fairly big resource requests.
kubectl apply -f - <<EOF
apiVersion: apps/v1
kind: Deployment
metadata:
  name: sleep
spec:
  replicas: 1
  selector:
    matchLabels:
      app: sleep
  template:
    metadata:
      labels:
        app: sleep
    spec:
      terminationGracePeriodSeconds: 0
      containers:
        - name: sleep
          image: docker.io/library/busybox:latest
          command: ["sleep", "infinity"]
          imagePullPolicy: IfNotPresent
          resources:
            requests:
              cpu: 50m
              memory: 50Mi
EOF
Once the Deployment is created, you can scale it to a moderate or massive number of Pods. Remember that by default, Kubernetes limits each node so it can only run 100 Pods.
Try running the below, and give the system a minute or two to catch up between each.
The below will full up the Control Plane nodes, and worker nodes will be needed to support the excess.
kubectl scale deployment sleep --replicas=100
kubectl scale deployment sleep --replicas=300
kubectl scale deployment sleep --replicas=400
You'll see the a new Node being added to the cluster, and the Pods being scheduled to run on it.
# Watch each Pod coming online, and see which node it gets scheduled to
kubectl get pods --watch --output wide

# Watch nodes coming online to support the new Pods
kubectl get nodes --watch --output wide
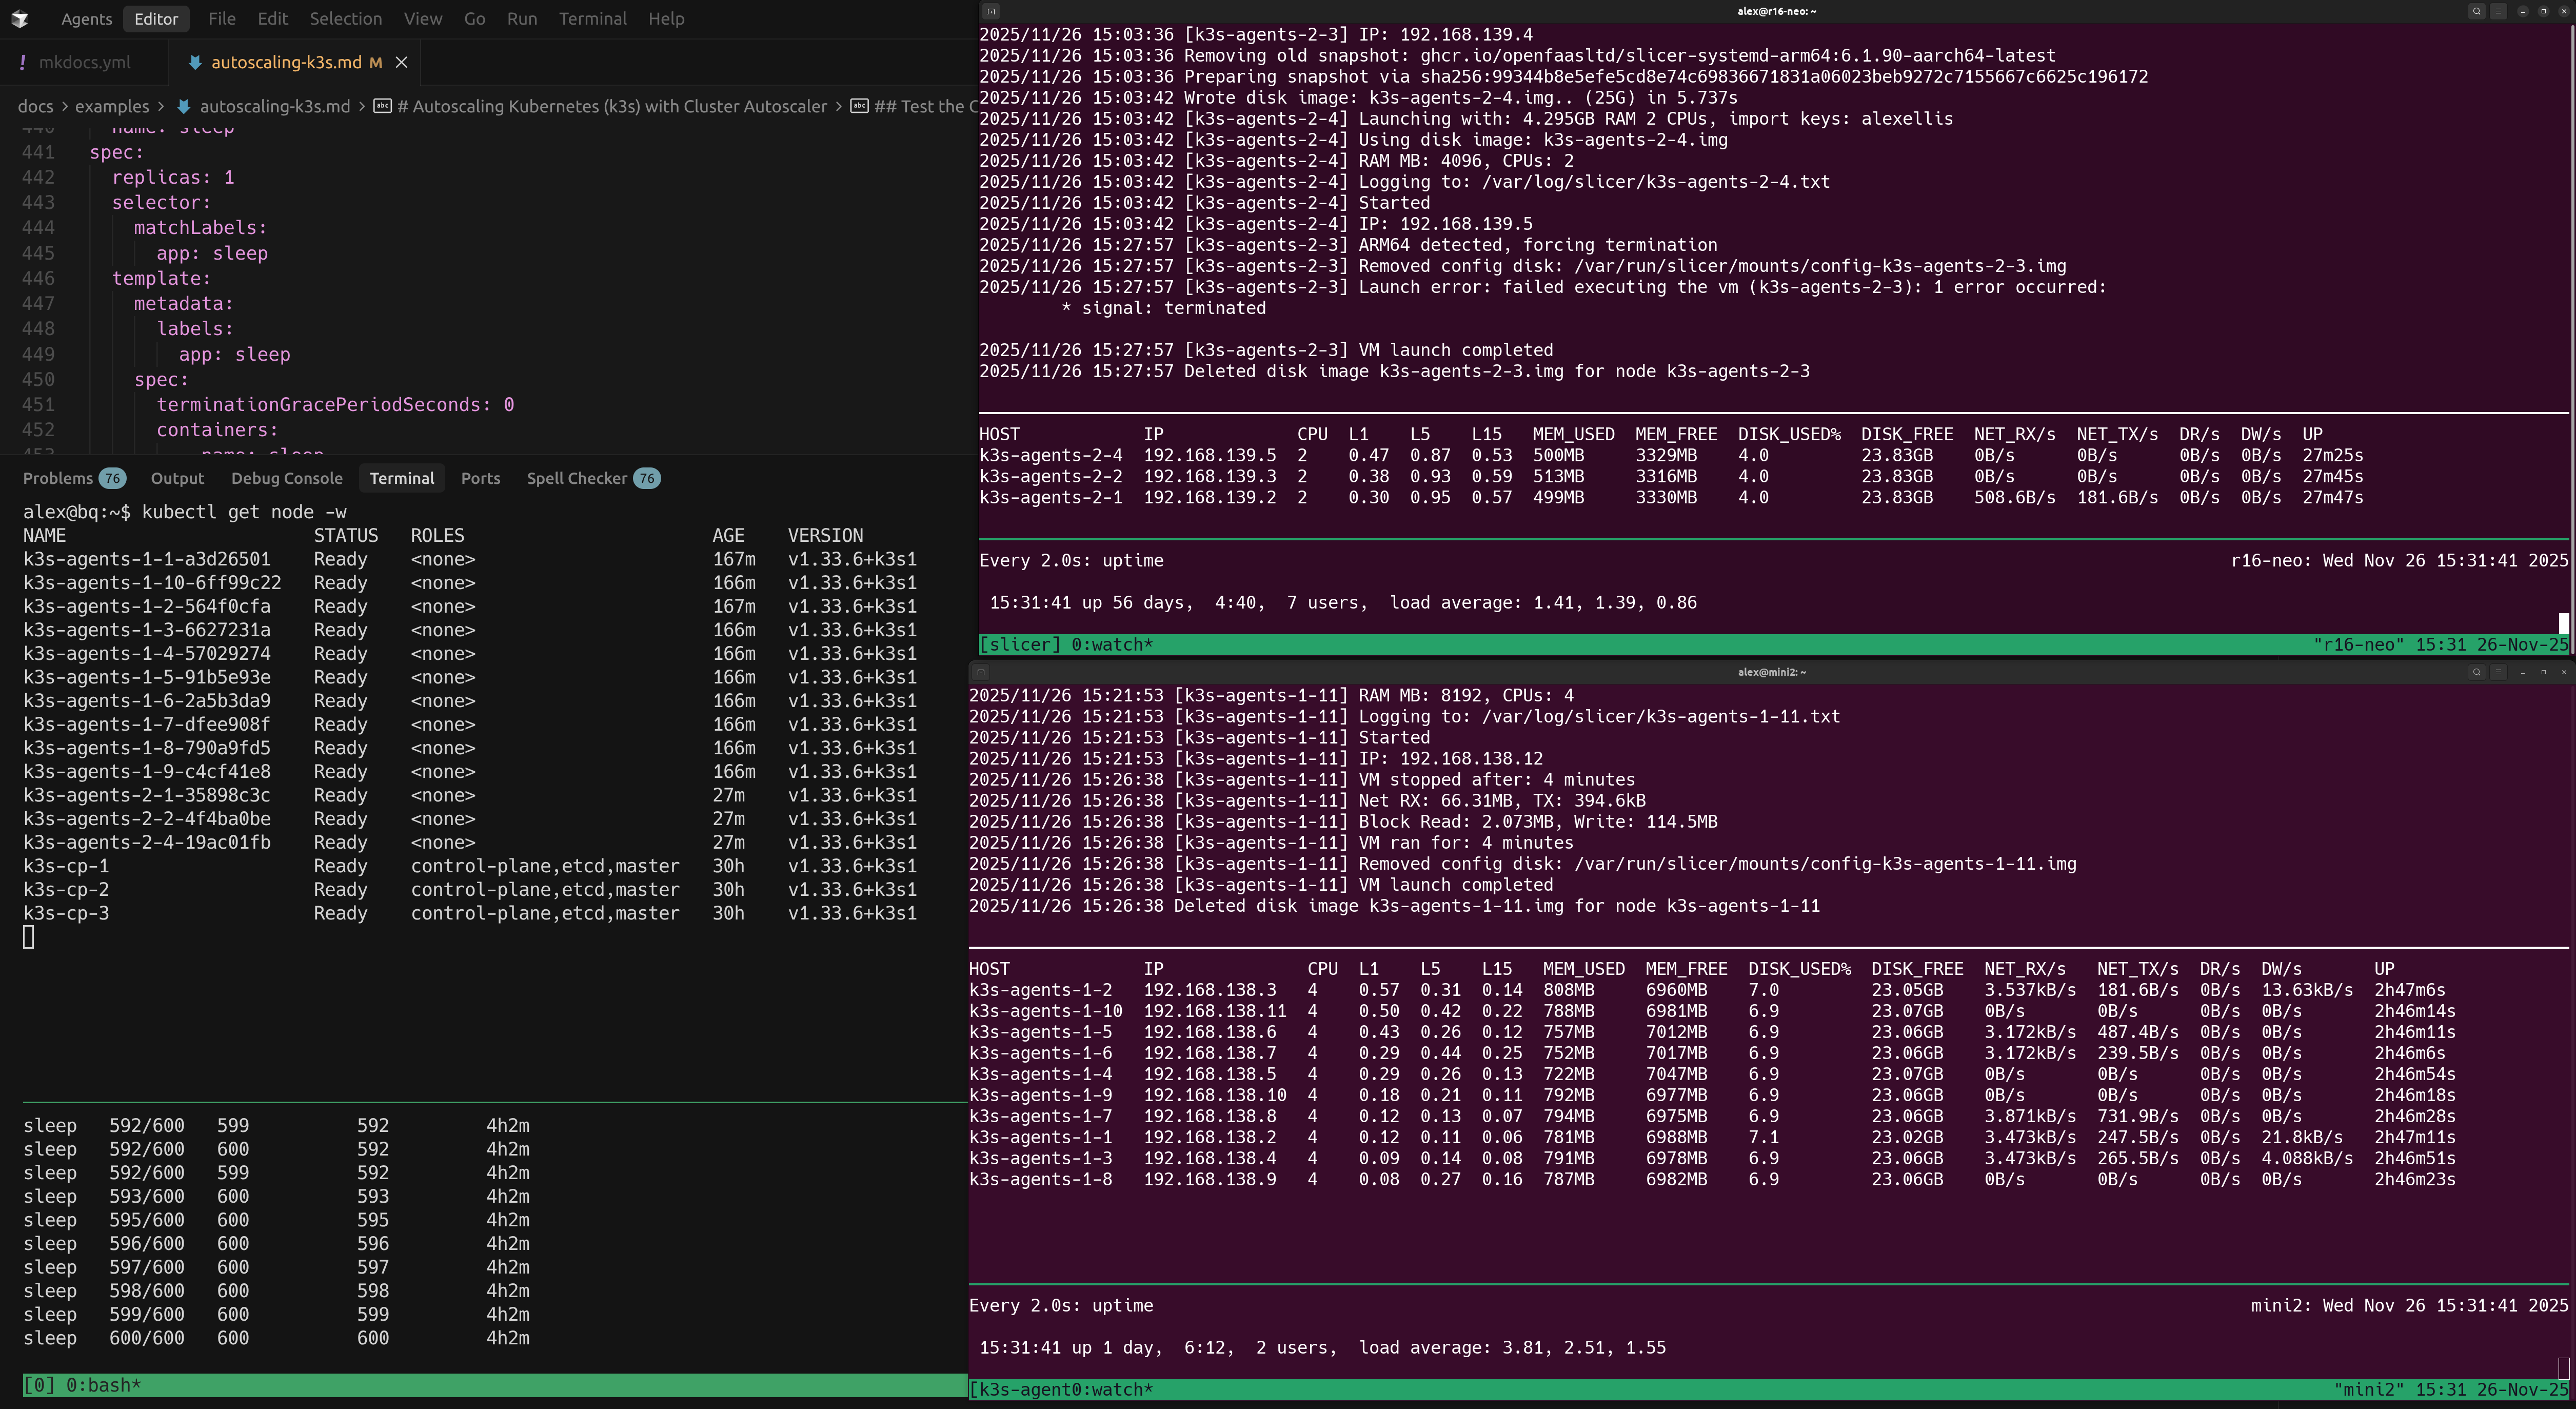
Example showing 600 Pods running across two Slicer hosts running worker nodes - a Ryzen 9 and a Raspberry Pi 5. The Control Plane is running on a separate N100 fanless mini PC.
These Pods run a simple sleep infinity command, so they are not doing anything that taxes the system, however you can view Node usage across the cluster with:
watch "kubectl top nodes"
Taints and tolerations
You can use a label to prevent new Pods from running on the Control Plane, and simulate autoscaling.
In production, OpenFaaS customers tend to run their functions on spot instances rather than on their control plane nodes.
kubectl taint nodes slicer-cp-1:NoSchedule
kubectl taint nodes slicer-cp-2:NoSchedule
kubectl taint nodes slicer-cp-3:NoSchedule
Now, newly created or restarted Pods will not be scheduled to run on the Control Plane nodes.
Next, you can create a Pod that tolerates the taint, and will be scheduled to run on the Control Plane nodes.
kubectl apply -f - <<EOF
apiVersion: v1
kind: Pod
metadata:
  name: sleep-pod
spec:
  containers:
    - name: sleep
      image: docker.io/library/busybox:latest
      command: ["sleep", "infinity"]
  tolerations:
    - key: slicer-cp
      operator: Equal
      value: "true"
      effect: NoSchedule
EOF
You'll see the a new Node being added to the cluster, and the Pod being scheduled to run on it.
Finally, remove the Pod and untaint the Control Plane nodes:
kubectl delete pod sleep-pod
kubectl taint nodes slicer-cp-1:NoSchedule-
kubectl taint nodes slicer-cp-2:NoSchedule-
kubectl taint nodes slicer-cp-3:NoSchedule-
Troubleshooting
Node says as NotReady
Check connectivity and routes. Remember these do not survive an interface going down/up or a reboot.
Remove the mode manually via kubectl delete node/NAME.
Check the Slicer output for the node, perhaps it failed to boot or the network didn't come up in time.
Left over nodes
Delete all nodes that are not part of the control plane, assuming they are all listed as NotReady:
kubectl delete node -l k3sup.dev/node-type=agent
Only one Slicer instance is getting used
The expander setting in values.yaml should be changed to random or most-pods to ensure that all Slicer instances are used.
The default is price and meant for the cloud, where the smallest node types are always picked first.
The Cluster Autoscaler is not picking up new configuration
If you have tainted any nodes, it may mean that the new Pod for the autoscaler cannot be scheduled, so remove the taints.
The Cluster Autoscaler says a node group is not ready
This error was observed during testing, restarting the deployment resolved the issue. We assume the autoscaler has a bug where it doesn't properly check readiness once it decides it's unhealthy.
Message observed: "Readiness for node group k3s-agents-2 not found"
Why are many Pods stuck as Pending?
The logs of the autoscaler are set to a verbose level which will explain most issues.
Look out to see if you've exceeded the maximum number of nodes for a node group i.e. "Skipping node group k3s-agents-1 - max size reached".
Diagnose an issue within a worker node
The slicer vm shell command will give you a root shell directly into any worker node.
On the host managing k3s-agents-1, you would run:
# Show the available nodes
sudo slicer vm list --url http://127.0.0.1:8081/nodes

# Get a root shell into node 1
sudo slicer vm exec --url http://127.0.0.1:8081/nodes k3s-agents-1-1
From there you can check the logs of the k3s service via sudo journalctl -u k3s -f.
Next steps
Now you have a Kubernetes cluster that can scale its capacity up and down with demand.
Why not try out something that scales Pods?
OpenFaaS which scales Pods
OpenFaaS Community Edition (CE) is a version of OpenFaaS that can be used for free for personal use, or a limited commercial trial.
Once you've deployed a function you can use something like the hey tool via (arkade get hey) to stress a function, and cause it to scale up.
Learn more about OpenFaaS Autoscaling.